The Making of Rift: Part 5, The Engine
Introduction
After a four post series on I2C, I wanted to talk a bit about the engine behind Rift. It’s a 60fps raycaster with billboard sprites written entirely in fixed point. The code was inspired by the algorithms in Lode’s excellent tutorial. In the whole, the game is very inspired by Doom.
Fixed Point
If you need a fractional component to a variable, chances are you’re going to use float. floats have a very different format than regular integers; inspired by scientific notation, they have an exponent and a fractional part. This allows them to be very precise but have a nearly unlimited range (the decimal point is floating). However, simple processors like those used on the Arduboy, the platform for which Rift runs on, don’t have floating point support. They have to be emulated in software which is very slow.
Fixed point is another alternative. It is formatted just like a regular integer, but some of the bits are reserved for fractions (the decimal point is fixed). In base 10, it’s like instead of storing 3.14, you store 314 with the understanding the decimal point is really shifted two places to the left. This allows you to have fractional components but have arithematic be done in hardware. It does increase the complexity, however, because fixed point is much more suceptible to overflowing and lack of precision than floats. You have to make sure that the fractional and integer parts are perfectly set for their usage.
Raycasting
Essentially, raycasting sends a ray starting at the player’s position for every column on the screen. It measures the distance that that ray has travelled. To apply perspective, it divides the wall height by the distance. This makes the farther away walls look smaller than the ones up close and allows for a fast but realistic-looking 3d approximation.
Rift’s engine actually can support variable high walls. This is done by multipling the standard wall height by a scale factor. Unfortunately, because of the fact the raycaster stops after one intersection, smaller walls in front of larger walls can block them. I experimented with multi-pass raycasters but the CPU load was too much. It still looks cool though.
One prominent feature I decided not to add was textured walls. This would have slowed down the raycaster significantly because of all the calculations required for just a single line. The “60fps” feeling was too good to give away.
Core Raycaster Loop:
do {
    //jump to next map square, OR in x-direction, OR in y-direction
    if (sideDistX < sideDistY) {
        sideDistX += deltaDistX;
        mapIndex += stepX;
        *side = 0;
    } else {
        sideDistY += deltaDistY;
        mapIndex += stepY;
        *side = 1;
    }
    *t = MAP_LOOKUP(mapIndex);
} while (*t == 0 || (*t >= secretDoor && doors[*t >> 4]));
The Main Game Loop
I stored a state variable to keep track of what state we’re in. Then, I just switched over it and called the correct update and draw functions. Various INIT states were used to ensure every screen would be properly set up.
switch (state) {
...
case LOBBY_INIT:
    wipe_effect();
    setup_lobby();
    break;
case LOBBY:
    uint8_t numPlayers = run_timeout();
    run_lobby(numPlayers);
    break;
case GAME_INIT:
    init_fast_random_seed();
    init_powerups();
    if (singleplayer) {
        wipe_effect();
        id = singleplayerId;
        init_ais();
    } else
        start_multiplayer();
    init_all_players();
    init_player();
    gameStart = millis();
    state = GAME;
case GAME:
    update_player();
    flash |= update_powerups();
    if (check_game_over())
        state = GAME_OVER_INIT;
    if (singleplayer)
        update_ais();
    else {
        update_multiplayer();
        run_timeout();
    }
    render();
    flash |= receive_multiplayer();
    break;
case GAME_OVER_INIT:
    wipe_effect();
    state = GAME_OVER;
case GAME_OVER:
    update_game_over();
    draw_game_over();
    break;
}
Hit Detection
To check if a sprite had hit another, I reused the raycasting logic to check if we’ve intersected with another sprite’s tile position.
if (shoot) {
    uint16_t otherPlayerMapIndexes[I2C_MAX_PLAYERS];
    for (uint8_t i = 0; i < I2C_MAX_PLAYERS; i++) {
        otherPlayerMapIndexes[i] = (sprites[i].posX >> 8) * mapHeight + (sprites[i].posY >> 8);
    }

    do {
        for (uint8_t i = 0; i < I2C_MAX_PLAYERS; i++) {
            if (sprite - sprites == i)
                continue;
            if (otherPlayerMapIndexes[i] == mapIndex) {
                sprite->otherPlayerHit = i;
                break;
            }
        }
        //jump to next map square, OR in x-direction, OR in y-direction
        if (sideDistX < sideDistY) {
            sideDistX += deltaDistX;
            mapIndex += stepX;
            *side = 0;
        } else {
            sideDistY += deltaDistY;
            mapIndex += stepY;
            *side = 1;
        }
        *t = MAP_LOOKUP(mapIndex);
    } while (*t == 0);
} else {
    ...
}
Then, if we hit a player, it sets our otherPlayerHit to that index so it will be sent over the wire and the other player will know they have been hit.
Secret Doors
Like Doom and Wolfenstein 3D, I really wanted to have secret passageways for the player to sneak up on others and get powerups. To do this, I needed a system of secret doors.
I decided to use an array of bools called doors to keep track of the positions (true is open, false is closed). In the tile map, I used the top nibble as an index into that array.
Tile Format:
DDDD TTTT
D: Index into doors
T: Tile
Then, when raycasting, if the tile is a secret door and the door is open, it lets the ray through.
if (shoot) {
    ...
} else {
    do {
        ...
    } while (*t == 0 || (*t >= secretDoor && doors[*t >> 4]))
}
Finally, to allow the opening of secret doors, if the shoot code intersected with a secret door I toggled the door.
if (shoot) {
    ...
    do {
    ...
    if (*t >= secretDoor) {
        uint8_t doorsIndex = *t >> 4;
        doors[doorsIndex] = !doors[doorsIndex];
    }
    } while (*t == 0)
    ...
}
Not checking for secret doors in the actual shoot code allows a subtle transition moment where the door almost slides forward or backwards.
Wipe Effect
In Doom, there is an amazing wipe effect transition that take you from one screen to the next. I really wanted something like that in my own game, so I set out researching how it was done and thought about it.
The first thing that I needed to implement was shifting down one pixal. The Arduboy format is actually very convenient for this. Pixels are packed vertically into bytes, eight in 1.
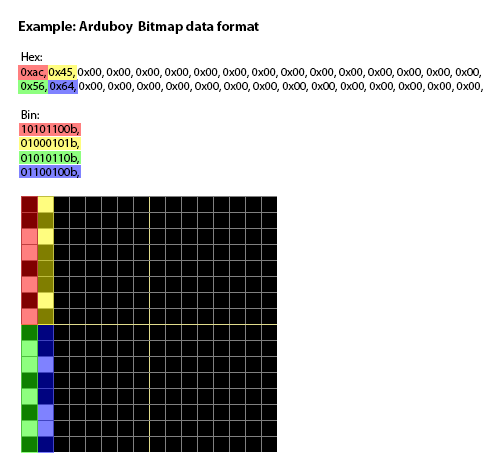
Thanks to @emutyworks for this image.
So, all I would need to do would be to left shift (<<) each byte down one pixel.
for (uint16_t i = 0; i < 1024; i++) {
    arduboy.sBuffer[i] <<= 1; // left shift to make bits go down on screen
}
However, what if there is a bit on the very edge of the number? It should be shifted into the next. To fix this, I designated the very top row as storage for the carry. When there was a bit on the edge, it would set the top row for that column to 1. Then, the next time we reached that column, it would see that carry bit and add it in.
for (uint16_t i = 0; i < 1024; i++) {
    uint8_t x = i % WIDTH;
    bool carry = arduboy.sBuffer[i] & 0x80; // check if last bit is true
    arduboy.sBuffer[i] <<= 1; // left shift to make bits go down on screen
    if (arduboy.sBuffer[x] & 0x01) { // check for carry at top of screen
        arduboy.sBuffer[i] |= 0x01; // add in carry bit to top of byte
        arduboy.sBuffer[x] &= 0xfe; // remove carry from top of screen
    }
    if (carry && i < 1024 - WIDTH) { // check if not last row
        arduboy.sBuffer[x] |= 0x01; // set carry flag at top of screen
    }
}
The first time I tried this, I forgot to not carry if the byte was on the last row. Amazingly, because the carry bit is stored at the top of the screen, it looped around!
The final thing is to do this for many times and delay some rows more than others. I used a simple python script to generate the delays.
import random

start = random.randint(0, 3)

for x in range(127):
    start += random.randint(-3, 3)
    if start < 0:
        start = 0
    print(start, end=',')
Then, I just used a table to store it and continued if the the iteration count was less than the delay.
const uint8_t wipeEffectDelay[WIDTH] PROGMEM = {
	0,1,3,2,3,4,6,6,9,11,14,17,19,20,23,26,24,24,25,26,23,25,28,28,31,28,26,23,20,19,18,18,19,
    17,18,18,19,18,20,21,19,20,23,22,22,24,21,20,20,17,20,22,23,24,27,26,25,22,19,20,23,22,20,
    19,22,21,22,20,23,20,22,19,16,19,20,20,22,20,22,25,22,22,19,18,16,17,20,21,20,17,17,19,17,
    19,20,20,21,19,20,21,20,20,17,20,17,19,17,17,15,13,11,9,6,3,6,3,6,3,2,3,1,0,1,4,5,5,6,
};
for (uint8_t count = 0; count < 100; count++) {
    for (uint16_t i = 0; i < 1024; i++) {
        uint8_t x = i % WIDTH;
        if (pgm_read_byte(&wipeEffectDelay[x]) > count) continue;
        bool carry = arduboy.sBuffer[i] & 0x80; // check if last bit is true
        arduboy.sBuffer[i] <<= 1; // left shift to make bits go down on screen
        if (arduboy.sBuffer[x] & 0x01) { // check for carry at top of screen
            arduboy.sBuffer[i] |= 0x01; // add in carry bit to top of byte
            arduboy.sBuffer[x] &= 0xfe; // remove carry from top of screen
        }
        if (carry && i < 1024 - WIDTH) { // check if not last row
            arduboy.sBuffer[x] |= 0x01; // set carry flag at top of screen
        }
    }
    arduboy.delayShort(10);
    display_fill_screen(false, 0x00);
}
I also had to make sure the screen wasn’t cleared before intiating the wipe effect; here, my custom display_fill_screen came in handy.

Conclusion
And that’s all I can really fit into one blog post! Until next time.